مراقب عام |
 |
| اشترك في: الاثنين إبريل 05, 2010 7:23 pm |
| مشاركات: 13047 | | مكان: المنصورة |
|
بسم الله الرحمن الرحيم
جاكت تريكو للبيبى بغرزة الطحلب بالباترون
Knitted jacket in moss st

Size: 1/3 - 6/9 - 12/18 months (2 - 3/4) years
Size in cm: 56/62 - 68/74 - 80/86 (92 - 98/104)
Materials: dark blue:250-300-300 (350-350) g
CIRCULAR NEEDLE (60 or 80 cm) SIZE 4 mm – or size needed to get 21 sts x 28 rows in stocking st = 10 x 10 cm.
WOODEN BUTTONS BURNED, NO 513: 4-4-4 (5-5) pieces
GARTER ST (back and forth on needle): K all rows.
PATTERN:
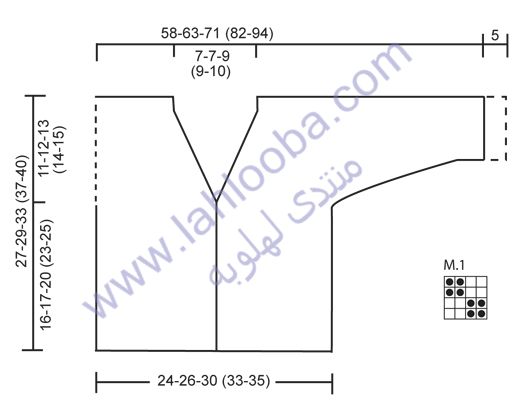
See diagram M.1 - diagram shows pattern from RS.
BUTTON HOLES:
Cast off for button holes on right band. 1 button hole = K tog 3rd and 4th st from edge and make 1 YO, on next row K YO.
Cast off for button holes when piece measures:
Size 1/3 months: 2, 6, 11 and 15 cm.
Size 6/9 months: 2, 7, 12 and 16 cm.
Size 12/18 months: 2, 8, 13 and 19 cm.
Size 2 years: 2, 7, 12, 17 and 22 cm
Size 3/4 years: 2, 8, 13, 19 and 24 cm
DECREASE TIP (applies to V-neck):
All dec are done from RS!
DEC AFTER 6 BAND STS AS FOLLOWS:
When first st should be K: Slip 1 st as if to K, K 1, psso.
When first st should be P: P 2 twisted tog (i.e. work in back loop of st instead of front).
DEC BEFORE 6 BAND STS AS FOLLOWS:
When last st should be K: K 2 tog.
When last st should be P: P 2 tog.
--------------------------------------------------------
JACKET:
Worked back and forth on circular needle.
Beg on front piece, cast on new sts for sleeve and work up to the shoulder. Work the other front piece, then place both front pieces tog and work down the back piece.
RIGHT FRONT PIECE:
Cast on 31-35-39 (43-43) sts (incl 6 band sts towards mid front and 1 edge st in the side) on circular needle size 4 mm with Merino Extra Fine. P 1 row from WS. Then work next row as follows from RS: 6 sts in GARTER ST – see explanation above (= band), * K 2, P 2 *, repeat from *-* until 1 st remains and finish with 1 edge st in GARTER ST. When a total of 4 rows in rib have been worked, continue with diagram M.1 with 6 band sts in garter st towards mid front and 1 edge st in garter st in the side. REMEMBER BUTTON HOLES ON RIGHT BAND - see explanation above. REMEMBER THE KNITTING TENSION!
When piece measures 7-8-9 (10-11) cm, work next row as follows from RS: 6 band sts in garter st, diagram M.1 over the next 18-22-22 (26-26) sts, slip the last 12-16-16 (20-20) sts that were worked on a stitch holder for pocket slit, continue diagram M.1 over the next 6-6-10 (10-10) sts and finish with 1 edge st in garter st. On next row cast on 12-16-16 (20-20) new sts over the sts on stitch holder = 31-35-39 (43-43) sts. Work pattern as before until piece measures 16-17-20 (23-25) cm. READ ALL OF THE FOLLOWING SECTION BEFORE CONTINUING!
V-NECK: Work 2 rows in garter st back and forth over the 6 band sts at beg of row (do not work the other sts on row) – this is done to make the V-neck pretty. Then work over all sts again while AT THE SAME TIME dec for V-neck every other row (i.e. on every row from RS) as follows: Dec 1 st a total of 12-14-16 (16-16) times – read DECREASE TIP.
INCREASE FOR SLEEVE: AT THE SAME TIME cast on new sts at the end of every row towards the side for sleeve: 5 sts 4-4-5 (5-5) times, 7 sts 0-1-1 (2-3) times and 25-24-21 (22-27) sts 1 time.
After last inc, continue diagram M.1 with 6 sts in garter st in each side for band and sleeve edge until piece measures 27-29-33 (37-40) cm. There are now 64-72-76 (88-100) sts on needle. Insert a marker here – NOW MEASURE PIECE FROM HERE. Continue pattern as before until 1 cm have been worked from marker – adjust so that last row is from WS. Slip the sts on a stitch holder.
LEFT FRONT PIECE:
Work as right front piece but reversed. NOTE: Do not cast off for button holes on left band.
BACK PIECE:
Slip the 64-72-76 (88-100) sts from right front piece back on circular needle size 4 mm, cast on 14-14-18 (18-22) new sts on needle (= neck line in back of neck) and slip the 64-72-76 (88-100) sts from left front piece on to same circular needle = 142-158-170 (194-222) sts. Work next row as follows from RS: 6 sts in garter st (= sleeve edge), diagram M.1 as before over the next 52-60-64 (76-88) sts, 26-26-30 (30-34) sts in garter st (= neck edge at the back), diagram M.1 over the next 52-60-64 (76-88) sts and 6 sts in garter st (= sleeve edge). Continue like this until 2 ridges (= 4 rows in garter st) have been worked over the middle 26-26-30 (30-34) sts. Then continue diagram M.1 as before over all sts with 6 sts in garter st in each side for sleeve edges. When piece measures 7½-8-8 (8½-8½) cm from marker on shoulder, cast off at beg of every row in each side as follows: 25-24-21 (22-27) sts 1 time, 7 sts 0-1-1 (2-3) times and 5 sts 4-4-5 (5-5) times = 52-56-64 (72-76) sts remain on back piece. Continue diagram M.1 with 1 edge st in garter st in each side until piece measures 25-27-31 (35-38) cm from marker. Work next row as follows from RS: 1 edge st in garter st, * K 2, P 2 *, repeat from *-* until 3 sts remain and finish with K 2 and 1 edge st in garter st. When a total of 4 rows in rib have been worked, K 1 row (from RS) over all sts before loosely casting off.
ASSEMBLY:
Sew the side and underarm seams inside 1 edge st.
Sew on buttons. Fold up the bottom 5 cm on each sleeve and fasten if necessary the fold up edge with a couple of neat little stitches.
POCKET SLIT:
Slip the 12-16-16 (20-20) sts from stitch holder on one front piece back on circular needle size 4 mm. Work rib back and forth with 1 st in garter st and 2 K sts in each side (seen from RS). When pocket slit measures 2½-2½-3 (3-3) cm, loosely cast off with K over K and P over P. Sew pocket slit to front piece with duplicate sts in each side. Sew pocket opening to bottom of pocket slit (where sts were put on a stitch holder) on the back of piece. Work another pocket slit the same way on the other front piece.

|
|