مراقب عام |
 |
| اشترك في: الاثنين إبريل 05, 2010 7:23 pm |
| مشاركات: 13047 | | مكان: المنصورة |
|
جاكت-كروشيه-حريمى-بغرزة مخرمة-وكشكشه من الطراف-بالباترون-جواكت كروشيه بالباترون-جاكت كروشيه انيق للعمل-باترونات ملابس كروشيه حريمى
بسم الله الرحمن الرحيم
جاكت كروشيه حريمى بغرزة مخرمة وكشكشة من الاطراف بالباترون
Crochet jacket with lace pattern and flounce at the bottom

Size: S - M - L - XL - XXL - XXXL
Materials: 450-500-550-600-650-700 g colour no 12, peach
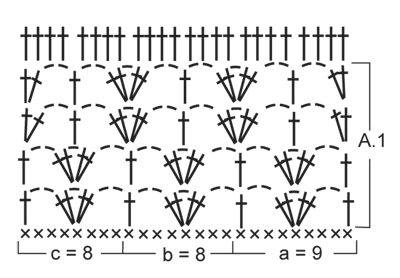
CROCHET HOOK SIZE 3 mm – or size needed to get 23 tr x 12 rows = 10 x 10 cm. When working pattern 1 repetition (= A.1 b) = approx. 3,5 cm in width x 4 cm vertically (= 4 rows).
BUTTONS: 6 pieces
CROCHET INFO:
Replace first tr on every row with 3 ch.
PATTERN:
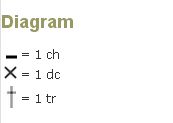
See diagram A.1.
DECREASE TIP:
Dec at beg of row as follows: Work sl sts over no of tr to be dec.
Dec at end of row as follows: When no of tr to be dec remains, turn.
--------------------------------------------------------
JACKET:
Worked bottom up, back and forth from mid front. READ CROCHET INFO!
Work 246-265-284-313-342-380 ch on hook size 3 mm with Safran. Continue with 1 dc in 2nd ch from hook, then 1 dc in each of the next 4-5-6-5-4-6 ch, * skip 1 ch, 1 dc in each of the next 5 ch *, repeat from *-* the entire row = 205-221-237-261-285-317 dc. Continue diagram A.1 as follows: 3 ch up from first dc, 1 tr in next dc, diagram a over the first 9 dc, diagram b until 10 dc remain, diagram c over the first 8 dc, then 1 tr in each of the last 2 dc (= 25-27-29-32-35-39 repetitions on row). Repeat the 4 rows in A.1 upwards until piece measures approx. 32-32-32-36-36-36 cm – finish after 4th row in diagram.
REMEMBER THE CROCHET TENSION!
On next row work tr as shown in 5th row in diagram, i.e. as follows: 1 tr in each of the first 4 tr, * 2 tr in ch-loop, 2 tr in next ch-loop, 1 tr in each of the next 4 tr *, repeat from *-*, finish with 2 tr in each of the last 2 ch-loops and 1 tr in each of the last 4 tr = 204-220-236-260-284-316 tr.
Then finish front and back piece separately.
FIRST FRONT PIECE:
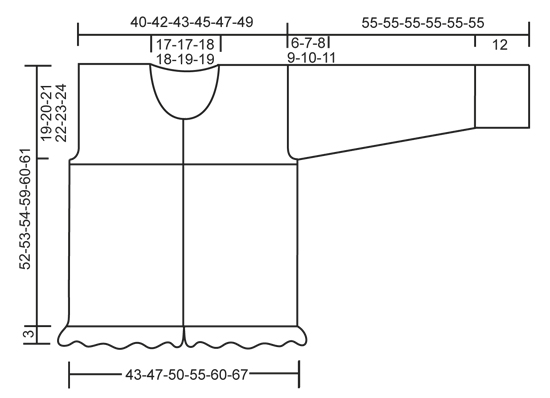
Work tr back and forth over the first 50-53-57-62-68-75 tr on row. At the same time dec towards the armhole on every row: 2 tr 0-0-1-2-3-5 times and 1 tr 1-2-2-3-5-6 times – SEE DECREASE TIP = 49-51-53-55-57-59 tr remain. When piece measures 42-43-44-47-48-49 cm, beg neck dec as follows: Dec 13-13-14-14-15-15 tr 1 time, 3 tr 1 time, 2 tr 2 times and 1 tr 3 times = 26-28-29-31-32-34 tr remain on row. Cut the thread when piece measures approx. 52-53-54-59-60-61 cm.
OTHER FRONT PIECE:
Work as first front piece but reversed.
BACK PIECE:
Work tr back and forth over the middle 94-100-108-118-130-144 tr (do not work over the 5-7-7-9-9-11 sts in each side = armhole). AT THE SAME TIME dec towards armhole in each side as on front piece = 92-96-100-104-108-112 tr. When piece measures 50-51-52-57-58-59 cm, work 1 row only over the outermost 28-30-31-33-34-36 tr in one side for shoulder, then work 1 more row while at the same time dec 2 tr towards the neck, work the rest of row = 26-28-29-31-32-34 tr on shoulder, cut the thread. Piece measures approx. 52-53-54-59-60-61 cm.
Work the same way on the other shoulder.
FLOUNCE AT THE BOTTOM OF BODY:
Work in the dc row at the bottom of body as follows - beg from WS:
ROW 1: 1 dc in first dc, * 3 ch, skip 1 dc, 1 dc in next dc *, repeat from *-* the entire row.
ROW 2: Turn with 5 ch, 1 dc in first ch-loop, * 4 ch, 1 dc in next ch-loop *, repeat from *-* the entire row.
ROW 3: Turn with 6 ch, 1 dc in first ch-loop, * 6 ch, 1 dc in next ch-loop *, repeat from *-* the entire row.
ROW 4: Work as follows in every ch-loop: 2 dc + 1 picot (= 3 ch, 1 dc in first ch) + 2 dc. Cut and fasten the thread.
SLEEVE:
Worked back and forth and sewn tog at the end.
Work 68-68-78-78-78-87 ch on hook size 3 mm with Safran. Turn and work 1 dc in 2nd ch from hook, then work 1 dc in each of the next 6-6-4-4-4-7 ch, * skip 1 ch, 1 dc in each of the next 5 ch *, repeat from *-* the entire row = 57-57-65-65-65-73 dc.
Continue to work diagram A.1 as follows: Diagram a over the first 9 dc, diagram b until 8 dc remain, then diagram c (= 7-7-8-8-8-9 repetitions on row). Continue like this until the 4 rows in diagram A.1 have been worked a total of 3 times vertically. Piece measures approx. 12 cm. On next row work tr as shown in 5th row in diagram, i.e. as follows: 1 tr in each of the first 2 tr, * 2 tr in ch-loop, 2 tr in next ch-loop, 1 tr in each of the next 4 tr *, repeat from *-*, finish with 2 tr in each of the last 2 ch-loops and 1 tr in each of the last 2 tr = 56-56-64-64-64-72 tr. Continue with 1 tr in every tr – AT THE SAME TIME when piece measures 16 cm, inc 1 tr in each side by working 2 tr in next to last tr in each side. Repeat inc 9-12-11-13-16-15 more times: SIZE S: Every 4th row, SIZE M + L: Every 3rd row, SIZE XL: Alternately every other and 3rd row, SIZE XXL + XXXL: Every other row = 76-82-88-92-98-104 tr.
When piece measures 49-48-47-46-45-44 cm (shorter measurements in the larger sizes because of longer sleeve cap and broader shoulder width), dec for sleeve cap on every row in each side as follows: 3 tr 1 time, 2 tr 5-6-8-9-10-11 times and 3 tr 1 time. Piece now measures approx. 55 cm for all sizes, cut the thread.
EDGE AT THE BOTTOM OF SLEEVE:
Work in the dc row at the bottom of sleeve as follows - beg from WS:
ROW 1: 1 dc in first dc, * 5 ch, skip 2 dc, 1 dc in next dc *, repeat from *-* the entire row - NOTE: For the no of sts to add up skip only 1 dc the last time in sizes S and M. In sizes L and XL skip 3 dc the last time.
Turn piece.
ROW 2: Work as follows in every ch-loop: 2 dc + 1 picot (= 3 ch, 1 dc in first ch) + 2 dc. Cut and fasten the thread.
ASSEMBLY:
Sew shoulder seams and sleeve seams edge to edge to avoid a chunky seam and sew sleeves in body.
Work up along right band, around the neck and down along left band as follows: 1 dc in first st, * 3 ch, skip approx. 1 cm, 1 dc in next st *, repeat from *-*.
Sew buttons on left band – top button should be approx. 1 cm from the top, then evenly spaced downwards. Button in ch-loops on right band.


|
|