مراقب عام |
 |
| اشترك في: الاثنين إبريل 05, 2010 7:23 pm |
| مشاركات: 13047 | | مكان: المنصورة |
|
تونيك كروشيه بغرزة جميلة وحواف مكشكشة بالباترون
بسم الله الرحمن الرحيم

Crochet tunic with lace pattern, flounce at the bottom and butterfly for decoration
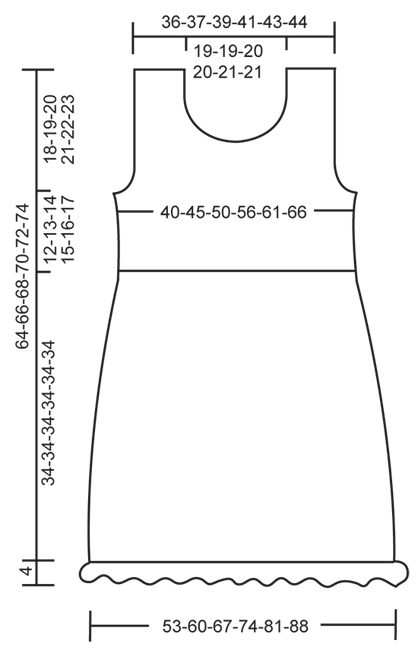
Size: S - M - L - XL - XXL - XXXL
Materials: 550-600-650-700-800-900 g colour white
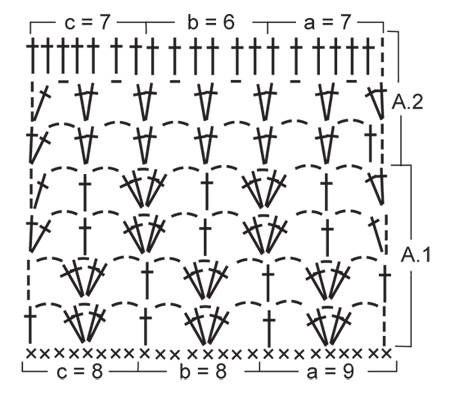
CROCHET HOOK SIZE 3 mm – or size needed to get 23 tr x 12 rows = 10 x 10 cm. When working pattern 1 repetition = approx. 3.5 cm in width x 4 cm vertically.
1.5-2 meter silk ribbon around the waist, approx. 10 mm wide in a suitable colour.
CROCHET INFO:
Replace first tr on every row with 3 ch.
PATTERN:
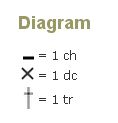
See diagrams A.1 and A.2.
DECREASE TIP (applies to neck and armhole):
Dec at beg of row as follows: Work sl sts over no of tr to be dec.
Dec at end of row as follows: When no of tr to be dec remains, turn.
--------------------------------------------------------
TUNIC:
Worked back and forth in 2 parts and sewn tog when finished.
FRONT PIECE:
Work 141-160-178-197-216-234 ch on hook size 3 mm with Cotton Viscose. Continue with 1 dc in 2nd ch from hook, then 1 dc in each of the next 6-4-8-6-4-8 ch, * skip 1 ch, 1 dc in each of the next 6 ch *, repeat from *-* the entire row = 121-137-153-169-185-201 dc. Continue pattern A.1 as follows: Diagram a over the first 9 dc, diagram b until 8 dc remain, then diagram c over these (= 15-17-19-21-23-25 repetitions in total on row). Repeat the 4 rows in diagram A.1 upwards until piece measures approx. 32 cm – finish after 4th row in diagram. REMEMBER THE CROCHET TENSION!
Then work diagram A.2 one time vertically. When A.2 has been worked, there are 92-104-116-128-140-152 tr on row. Then work 1 tr in every tr - READ CROCHET INFO.
When piece measures 46-47-48-49-50-51 cm, dec for armhole in each side on every row as follows – READ DECREASE TIP: 4 tr 1 time, 3 tr 0-0-1-1-2-3 times, 2 tr 0-1-1-3-3-4 times and 1 tr 1-3-4-4-5-4 times in each side = 82-86-90-94-98-102 tr remain on row.
When piece measures 53-54-56-57-59-60 cm, beg neck dec and finish each shoulder separately.
FIRST SHOULDER: Work tr back and forth over the first 28-30-31-33-34-36 tr in one side – AT THE SAME TIME dec towards the neck on every row: 3 tr 1 time, 2 tr 2 times and 1 tr 2 times = 19-21-22-24-25-27 tr remain on shoulder. When piece measures 64-66-68-70-72-74 cm, cut the thread.
OTHER SHOULDER: Work the same way as the first.
BACK PIECE:
Work as front piece up to and with armhole dec = 82-86-90-94-98-102 tr on row. Continue to work until piece measures approx. 62-64-66-68-70-72 cm. Now finish each shoulder separately as follows: Work 1 row with tr over the first 21-23-24-26-27-29 tr, turn, dec the first 2 tr and work the rest of row, cut the thread. Repeat on the other shoulder.
ASSEMBLY:
Sew shoulder seams edge to edge to avoid a chunky seam. Sew side seams edge to edge so that they are less visible.
FLOUNCE AT THE BOTTOM:
Work in the dc row at the bottom of body as follows (beg in one side):
ROUND 1: 1 dc in first dc, * 3 ch, skip 1 dc, 1 dc in next dc *, repeat from *-* the entire round, finish with 1 sl st in first dc.
ROUND 2: 2 ch, 1 dc in first ch-loop, * 4 ch, 1 dc in next ch-loop *, repeat from *-* the entire round, finish with 1 sl st in first dc.
ROUND 3: 2 ch, 1 dc in first ch-loop, * 4 ch, 1 dc in next ch-loop *, repeat from *-* the entire round, finish with 1 sl st in first dc.
ROUND 4: 2 ch, 1 dc in first ch-loop, * 5 ch, 1 dc in next ch-loop *, repeat from *-* the entire round, finish with 1 sl st in first dc.
ROUND 5: 2 ch, 1 dc in first ch-loop, * 5 ch, 1 dc in next ch-loop *, repeat from *-* the entire round, finish with 1 sl st in first dc.
ROUND 6: Work as follows in every ch-loop: 2 dc + 1 picot (= 3 ch, 1 dc in first ch) + 2 dc. Cut and fasten the thread.
EDGE AROUND THE ARMHOLES AND NECK:
Beg mid back of neck and mid under armhole.
ROUND 1: 1 dc in first st, * 3 ch, skip approx. ½ cm, 1 dc in next st *, repeat from *-* the entire round, finish with 1 sl st in first dc.
ROUND 2: Work as follows in every ch-loop: 1 dc + 1 picot (= 3 ch, 1 dc in first ch) + 1 dc. Cut and fasten the thread.
SILK RIBBON: Thread a silk ribbon in the row with eyelet holes at the top below the yoke – beg and end in the left side at the front and make a small bow.
BUTTERFLY - for decoration:
WINGS: Work 15 ch on hook size 3 mm. Work all rows from RS.
ROW 1: Work 3 triple tr in 6th ch from hook, 1 ch, 1 tr in next ch, 2 ch (on 2nd row beg working here), 2 triple tr in next ch, 1 triple tr in next ch, 3 ch, 1 sl st in next ch, 3 ch (on 3rd row beg working here), 1 triple tr in next ch, 2 triple tr in next ch, 1 ch, 1 tr in next ch, 2 ch, 3 triple tr in next ch, 5 ch, 1 sl st in last ch. Cut and fasten the thread.
ROW 2: Start by working 1 sl st in the second of the 2 ch from previous row (see 1st row), 1 ch, in next triple tr work as follows: 1 htr and 1 tr, in next triple tr work as follows: 1 tr (on 4th row beg working here), 1 ch, 1 dtr and 1 tr, in next triple tr work as follows: 1 tr and 1 htr, 1 ch, 1 sl st in the 1st of the 3 ch from previous row. Cut and fasten the thread.
ROW 3: Start by working 1 sl st in the third of the 3 ch from 1st row (see 1st row), 1 ch, in next triple tr work as follows: 1 htr and 1 tr, in next triple tr work as follows: 1 tr (on 5th row beg working here), 1 dtr, 1 ch, 1 tr, in next triple tr work as follows: 1 tr and 1 htr, 1 ch, 1 sl st in 1 ch from 1st row. Cut and fasten the thread.
ROW 4: Start by working 1 sl st in tr from 2nd row (see 2nd row), 1 ch, in next dtr work as follows: 1 dc, 1 ch and 1 dc, 1 ch, 1 sl st in next tr. Cut and fasten the thread.
ROW 5: Start by working 1 sl st in tr from 3rd row (see 3rd row), 1 ch, in next dtr work as follows: 1 dc, 1 ch and 1 dc, 1 ch, 1 sl st in next tr. Cut and fasten the thread.
BODY:
Work as follows with double yarn: 6 ch, 2 dc in the 2nd ch from hook (= head). Cut and fasten the thread. Sew the body on to the wings with the head up between the big wings.
Finish by working a row of sl sts along the edge of the big wings.
Sew the butterfly to the left side of yoke.


|
|